


Those old blinds gathering dust in the garage? Before you haul them to the curb, stop. Tossing them seems easy, but what if they held hidden potential? We’re here to show you exactly how to transform that “trash” into treasure with some clever upcycling.
Get ready to discover how to make:
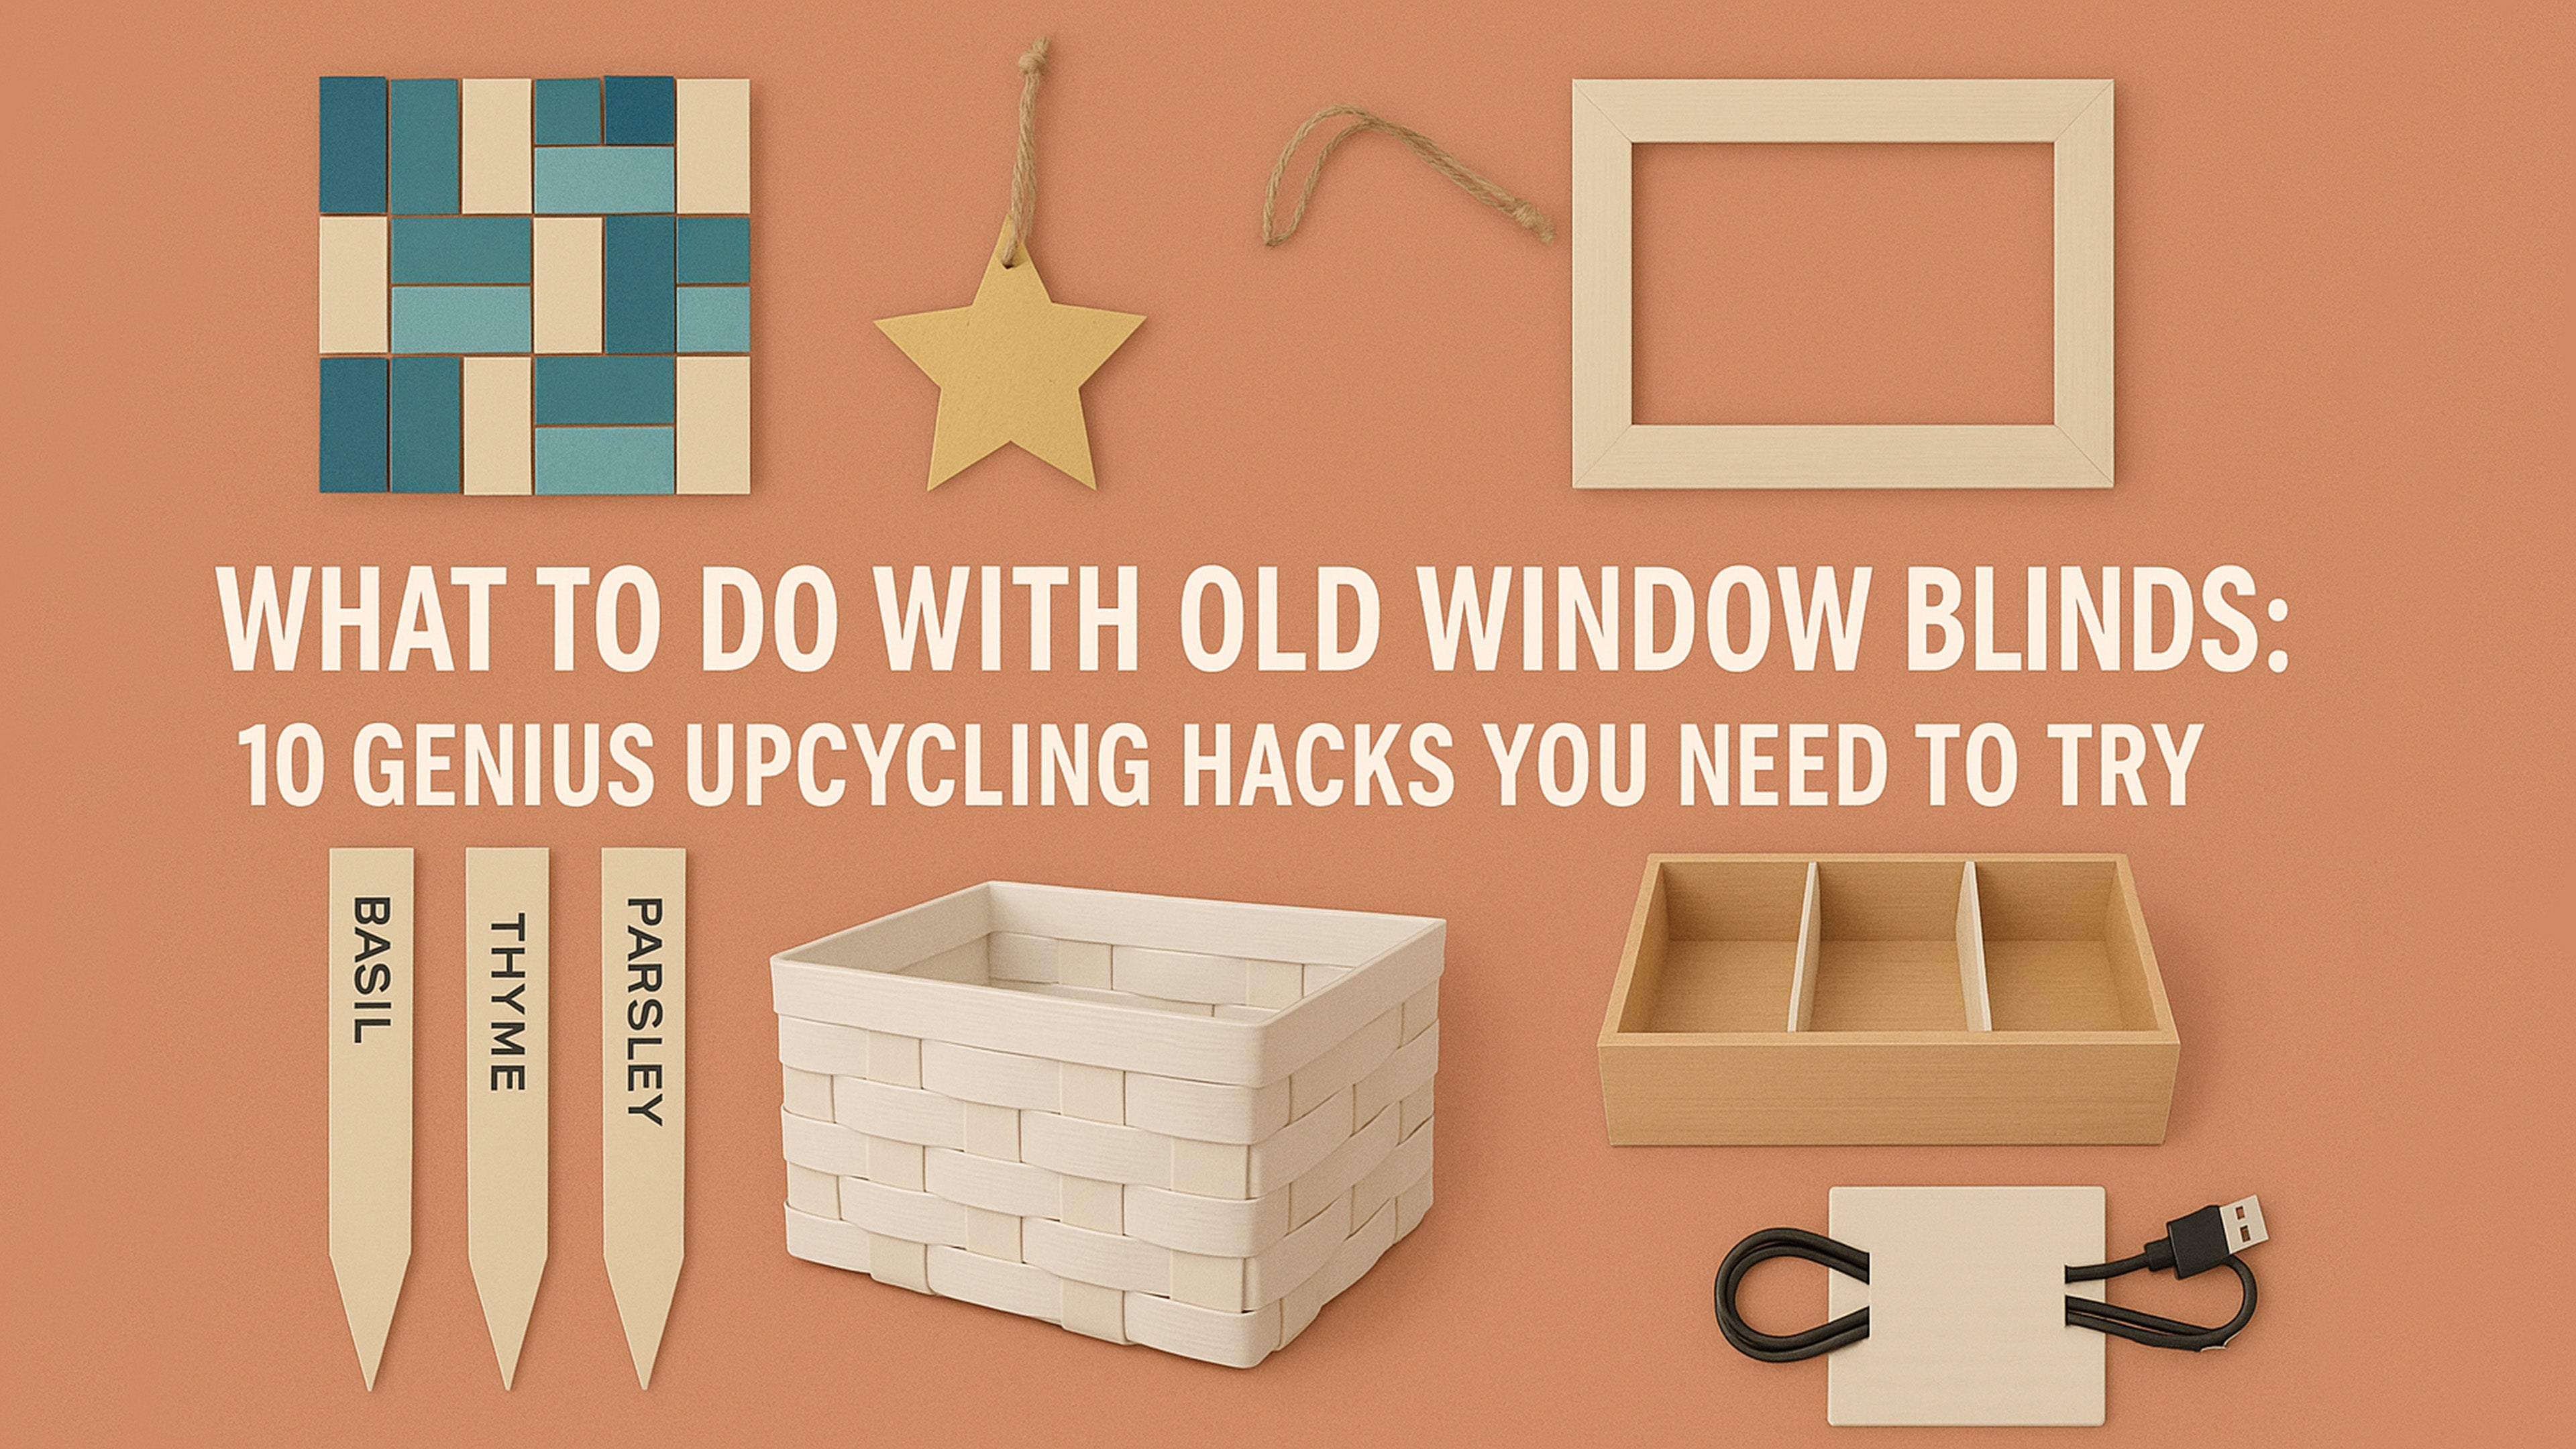
1. Creative Wall Art
2. Handy Garden Markers
3. Unique Storage Solutions
4. Custom Gift Tags & Decor
5. DIY Cleaning Tools
6. Simple Drawer Organizers
7. Upcycled Picture Frames
8. Handy Repair Aids
9. And more unexpected uses!
Considering an upgrade down the line? BlindsMagic offers beautiful, smart blinds made with eco-friendly materials. Our automated options add convenience and help manage your home's energy without future clutter.
1. Creative Wall Art
Do you think those old blind slats are destined for the dumpster? Think again. Those uniform pieces are practically begging to be turned into eye-catching wall art. Whether you've got vinyl, wood, or even aluminum blinds collecting dust, you have the raw materials for a truly unique piece. Let's ditch the generic store-bought stuff.
First, give your slats a good cleaning. A simple wipe-down removes dust and grime. If you plan to paint vinyl or wood, lightly sand them first – this gives the primer and paint something solid to grip onto. Seriously, don't skip the prep work; it makes all the difference later.
Ready to create? Here are a few paths you can take:
● Painted Patterns: Cut slats to your desired lengths. Prime 'em up, then go wild with acrylic paints. Think bold geometrics, cool color fades, or use stencils for sharp designs. Arrange your painted slats on a backing board (like thin plywood) or mount them within an old picture frame.
● Woven Textures: Got wider faux wood or fabric slats? Use these as a base. Weave colorful yarn, fabric scraps, or even thin strips of other painted blind slats through them. This builds fantastic texture and visual interest.
● Slat Mosaics: This takes patience but looks amazing. Carefully cut slats into smaller, uniform shapes (safety first!). Arrange these "tiles" onto a sturdy backing, gluing them down to form an image or abstract pattern.
Pro Tips for Nailing It:
● Safety Gear: Always wear gloves and eye protection when cutting metal or vinyl slats. Those edges can be surprisingly sharp.
● Get Sticky: Use a strong adhesive appropriate for the slat material. E6000 or a good quality wood/plastic epoxy usually works well.
● Plan Ahead: Sketch your design or lay out all your pieces before the glue comes out. Trust us on this one.
2. Handy Garden Markers from Slats
Need to remember where you planted the parsley versus the peppers? Those old blind slats transform into perfect garden markers. Especially vinyl or aluminum ones – they stand up surprisingly well to weather compared to wood stakes. Plus, you get to make exactly as many as you need.
Making them is straightforward:
1. Cut to Size: Snip slats into marker lengths, maybe 6-8 inches. Create a pointed end on each to easily push into the soil. Tin snips work well for metal or vinyl.
2. Clean 'Em Up: Give the surfaces a quick wipe so your writing sticks.
3. Label Away: Use a permanent marker to write plant names. Pro Tip: Oil-based paint pens last much longer outdoors than standard Sharpies.
4. (Optional) Seal the Deal: For extra longevity, especially if you painted designs, spray on a clear acrylic sealant.
These markers are surprisingly durable. Of course, purpose-built outdoor materials, like those used in high-quality modern blinds, offer maximum weather resistance from the start.
3. Unique Storage Boxes & Organizers
Tired of small items cluttering your desk or drawers? Old blind slats, particularly wood or wider vinyl ones, can be crafted into custom storage solutions. You can make small boxes, drawer dividers, or nifty organizers for craft supplies, jewelry, or hardware. Get ready to tidy up.
Here’s how you might tackle it:
● Weave a Basket: Cut slats into uniform strips. Weave them together, maybe around a simple cardboard form, to create small, basket-like containers. Secure ends with strong glue.
● Build a Box: Cut slats precisely to form the sides and base of a small box. Glue the edges together carefully – small clamps help hold things tight while the glue sets. You can build simple square or rectangular boxes.
● Drawer Dividers: Simply cut slats to the exact width or length of your drawer. Position them inside to create custom compartments. Secure them with a dab of removable adhesive if needed.
Making it Work:
● Measure Twice: Accuracy counts when building boxes. Measure carefully before cutting.
● Strong Bonds: Use wood glue for wood slats or a strong epoxy/plastic cement for vinyl.
● Line it Up: Consider lining your finished box with felt or fabric for a softer touch inside.
Creating order from chaos feels good, doesn't it? It's similar to the streamlined feel you get with smart home solutions. For instance, BlindsMagic’s automated blinds help simplify your routine and reduce cord clutter – just another way to bring calm and order to your space.
4. Custom Gift Tags & Decor Accents
Add a personal touch to presents or holidays with custom tags and decorations made from old blind slats. Any material works – vinyl, wood, even aluminum. They're simple to make and way more interesting than generic store-bought tags. This is your chance to get really creative on a small scale.
Here’s the basic idea:
1. Shape Up: Cut slats into your desired shapes. Think classic rectangles, stars, hearts, or whatever fits your theme. Use sturdy scissors or tin snips.
2. Punch It: Make a hole near the top for threading ribbon or twine.
3. Decorate: Now, the fun part. Paint them, use permanent markers, add glitter, or decoupage tiny bits of decorative paper onto them.
○ Pro Tip: Lightly sand wood edges for a smoother finish before decorating.
4. Label: Write names or messages clearly. A sealant spray can protect your artwork.
Making something by hand adds character, much like selecting unique decor elements for your home.
5. Clever DIY Cleaning Tools

Who knew old blinds could help you clean? Sturdy vinyl or aluminum slats can be repurposed into surprisingly effective tools for tackling tricky spots around the house. Don't toss that slat – turn it into a problem solver.
Put those slats back to work:
● Custom Scrapers: Cut a manageable length of slat. You can even carefully shape one end (test first.) for specific tasks like removing sticky labels from jars or GENTLY nudging grime from crevices. Always test in an unseen area to avoid scratching.
● Crevice Cleaners: Thin slats are great for dislodging dust bunnies from keyboard gaps, window tracks, or air vents where cloths can't reach.
● Narrow Duster: Wrap a microfiber cloth around the end of a slat, secure it with a rubber band, and presto. You have a tool for dusting under appliances or between tight furniture gaps.
Smooth any sharp edges after cutting for safety. Keeping things clean feels efficient, right? Modern home solutions often aim for that same low-maintenance ease.
6. Unique Upcycled Picture Frames
Give your favorite photos a unique home by crafting picture frames from old blind slats. Wood or faux wood slats work particularly well, lending a rustic or even a modern vibe depending on your finish. You can build a frame from scratch or embellish an existing one.
Frame your memories like this:
● Build from Slats: Carefully cut slats to size, often using 45-degree mitered cuts at the corners for a classic frame shape. Glue the corners securely, using clamps while they dry. You'll need to figure out a backing and how to hold the picture and glass/plexiglass.
● Embellish a Basic Frame: Have a plain, flat-surfaced frame? Glue pieces of cut slats onto it to add texture, pattern, or a border. Paint or stain the slats before or after attaching.
● Layered Look: Cut slats to uniform lengths. Glue them, slightly overlapping, onto a sturdy backing board, leaving a central opening perfectly sized for your photo.
Framing Tips:
● Accuracy Matters: Use a miter box or saw for precise 45-degree cuts if building a frame.
● Strong Hold: Wood glue and corner clamps are your friends here.
● Finishing Touch: Consider paint, wood stain, or leaving the natural slat finish.
These DIY frames offer a distinct, handcrafted aesthetic. It's one way to frame something important. Similarly, high-quality window treatments like those from BlindsMagic can frame your view beautifully, enhancing the entire room's look and feel. Seeing a cherished photo displayed within a frame, you made yourself adds an extra layer of meaning.
7. Simple Custom Drawer Dividers
Is your kitchen utensil drawer a jumbled mess? Or maybe your office supplies look like a tornado hit them? Grab some old blind slats (vinyl, wood, or plastic work well) and create perfectly sized drawer dividers in minutes. It’s a super quick way to bring instant order.
Here’s the lowdown:
1. Measure Up: Get the exact inside height, width, and/or length of your drawer space.
2. Cut Slats: Trim the slats to fit snugly. Cut for height first, then the length or width you need for your partition.
3. Position: Simply place the cut slats into the drawer. For a grid, you might need to carefully cut interlocking notches. A dab of removable adhesive putty can keep them from shifting.
Make sure your cuts are straight for the best fit. This kind of simple organization makes daily routines smoother. It's similar to the way BlindsMagic's smart home integrations streamline how you manage light and privacy – removing little hassles adds up to real convenience. Imagine opening that chaotic drawer and finding everything perfectly compartmentalized.
8. Quick Fixes: Shims & Spacers
Don't underestimate the power of a small offcut. Those little pieces of sturdy blind slat (especially wood or thick vinyl) make fantastic shims and spacers for quick household fixes or DIY projects. Keep a few pieces handy – you'll be surprised how often they save the day.
Use them for tasks like:
● Wobble Stoppers: Slip a small piece under a wobbly table or chair leg for instant stability.
● Project Spacers: Need consistent spacing when building something or mounting items? Small slat pieces work great.
● Temporary Fixes: Use them as quick gap fillers until a more permanent solution is ready.
Cut the pieces cleanly to the size you need. While these make great temporary fixes, remember that core home features benefit from lasting quality.
9. DIY Cord & Cable Tidies
Are tangled earbuds and messy USB cables cramping your style? Use small pieces of vinyl blind slats to create simple, effective cord winders. It’s an easy way to tame the digital spaghetti that accumulates around charging stations and desks.
Wrangle those wires:
1. Cut Pieces: Snip slats into small rectangles (maybe 1 inch by 3 inches).
2. Make Notches: Cut small notches on opposite ends of the rectangle. These will hold the cord ends securely.
3. Wrap It Up: Wind your cable neatly around the middle section, tucking the ends into the notches.
Smooth any sharp edges after cutting so they don't snag. Making different sizes helps manage various cables. Clearing cord clutter instantly makes a space feel cleaner and safer, much like eliminating the dangling cords on window treatments.
10. Responsible Donation & Recycling Routes

So, maybe DIY upcycling isn't your jam right now. That’s fine. But please don't just toss those old blinds in the trash without checking the options first. Finding a responsible way to dispose of them is key.
Here’s your action plan:
1. Know Your Material: Are they vinyl (PVC), aluminum, wood, faux wood, or fabric? This is the most important step as it dictates where they might go.
2. Check Local Waste Rules: Call your town or city's waste management authority or check their website. Rules vary wildly. Some places have special recycling days; others say landfill only. Don't guess.
3. Consider Donation: Habitat for Humanity ReStores or local thrift shops may take blinds if they are spotlessly clean, fully functional, and include all mounting hardware. Always call them first to confirm.
4. Seek Recyclers: Metal blinds can often go to scrap metal recyclers. Finding PVC or mixed material recycling is harder but worth an online search for specialized programs near you.
Clean items thoroughly before donating, and include all the parts. Choosing sustainable options from the beginning makes end-of-life disposal easier. That's why BlindsMagic prioritizes eco-friendly, certified materials like OEKO-TEX and GreenGuard – it's about making responsible choices for your home and the environment from day one. Knowing your old blinds avoided the landfill offers genuine peace of mind.
From Old Slats to Smart Style with BlindsMagic
So, those old blinds aren't just destined for the landfill. With some creativity, you can give them a surprising second life as art, organizers, or helpful tools around the house. We hope these ideas inspire you to see potential before tossing them out.
Here’s a quick recap of what you can do:
● Transform slats into unique wall art or picture frames.
● Craft durable garden markers or handy cleaning tools.
● Build custom storage boxes or simple drawer dividers.
● Make personalized gift tags, decor, or cable tidies.
● Use pieces for small repairs like shims or spacers.
● Always explore donation or proper recycling routes first.
Upcycling is a fantastic approach for old blinds. When the time comes for replacement, choosing BlindsMagic offers a smart upgrade. You get stylish, high-quality treatments made with eco-friendly materials, plus options for effortless automation. It’s about enhancing your home beautifully and efficiently from the start.